Wednesday, March 6, 2019

How to hide warning message in React Native app?

Software Required
-NPM version 6.4.1
-expo version 2.6.14
-Atom 1.34.0

Problems
  • During my development, encounter error as shown below when try to test it on Expo client.
Require cycles are allowed, but can result in uninitialized values. Consider refactoring to remove the need for a cycle.


Steps
  • Add the line as shown below into your App.js
  •  console.disableYellowBox = true;  
    
  • It may not solve the root cause of the problem, it may temporary hide the uncomfortable warning message on your App. Meanwhile, it buy you time to look for solution if you need a quick release.
  •  
    ...
    render() {
        console.disableYellowBox = true;
        ...  
    

    Wednesday, February 13, 2019

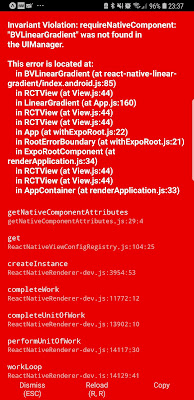
    How to resolve "requireNativeComponent: "BVLinearGradient" was not found in the UIManager" error message in React Native project?

    Software Required
    -NPM version 6.4.1
    -expo version 2.6.14
    -Atom 1.34.0

    Problems
    • During my development, encounter error as shown below when try to test it on Expo client.
    Invariant Violation: requireNativeComponent: "BVLinearGradient" was not found in the UIManager.

    Steps
  • Import "LinearGradient" class from expo. It will work like a charm.
  •  import { LinearGradient } from 'expo';

    Monday, February 11, 2019

    How to resolve Expo client hanging issue when follow the NativeBase ReactNavigation tutorial?

    Software Required
    NPM version 6.4.1
    expo version 2.6.14
    Atom 1.34.0
    NativeBase 2.10.0. Please refer to link

    Problems

    • Follow the sample tutorial provided by NativeBase and it hang my Expo client.
    • Below are the sample code that I used from NativeBased tutorial.
    import React, { Component } from "react";
    import Expo from "expo";
    import HomeScreen from "./src/HomeScreen/index.js";
    export default class AwesomeApp extends Component {
      constructor() {
        super();
        this.state = {
          isReady: false
        };
      }
      async componentWillMount() {
        await Expo.Font.loadAsync({
          Roboto: require("native-base/Fonts/Roboto.ttf"),
          Roboto_medium: require("native-base/Fonts/Roboto_medium.ttf"),
          Ionicons: require("native-base/Fonts/Ionicons.ttf")
        });
        this.setState({ isReady: true });
      }
      render() {
        if (!this.state.isReady) {
          return <Expo.AppLoading />;
        }
        return <HomeScreen />;
      }
    }
    
    
    Steps
    • After a long troubleshooting, I manage to identify the line as shown below that caused the hang.
    ...
        await Expo.Font.loadAsync({
    ...
    
    • Replace App.js with the sample source as shown, remove "Expo." before the Font.loadAsync, it just working great. No more hanging in my Expo client.
    import React, { Component } from "react";
    import HomeScreen from "./src/HomeScreen/index.js";
    import {Font, Expo, AppLoading} from 'expo';
    export default class AwesomeApp extends Component {
      state={
        isReady: false
      }
    
      constructor() {
        super();
      }
    
      async componentWillMount() {
        await Font.loadAsync({
          Roboto: require("native-base/Fonts/Roboto.ttf"),
          Roboto_medium: require("native-base/Fonts/Roboto_medium.ttf"),
          Ionicons: require("native-base/Fonts/Ionicons.ttf")
        });
        this.setState({ isReady: true });
      }
    
      render() {
        if (!this.state.isReady) {
              return <AppLoading />;
        }
    
        return <HomeScreen />;
      }
    }


    How to resolve "The Image component cannot contain children." error message when follow the NativeBase ReactNavigation tutorial?

    Software Required
    NPM version 6.4.1
    expo version 2.6.14
    Atom 1.34.0
    NativeBase 2.10.0. Please refer to link

    Problems

    • Follow the sample tutorial provided by NativeBase and encounter error message as shown below.
    Error: Error: The <image> component cannot contain children. If you want to render content on top of image, consider using the <ImageBackground> component or absolute positioning.
    • Troubleshoot the source code and discovered that the Image component in SideBar.js that caused the error message
    import React from "react";
    import { AppRegistry, Image, StatusBar } from "react-native";
    import { Container, Content, Text, List, ListItem } from "native-base";
    const routes = ["Home", "Chat", "Profile"];
    export default class SideBar extends React.Component {
      render() {
        return (
          <Container>
            <Content>
              <Image
                source={{
                  uri: "https://github.com/GeekyAnts/NativeBase-KitchenSink/raw/react-navigation/img/drawer-cover.png"
                }}
                style={{
                  height: 120,
                  alignSelf: "stretch",
                  justifyContent: "center",
                  alignItems: "center"
                }}>
                <Image
                  square
                  style={{ height: 80, width: 70 }}
                  source={{
                    uri: "https://github.com/GeekyAnts/NativeBase-KitchenSink/raw/react-navigation/img/logo.png"
                  }}
                />
              </Image>
              <List
                dataArray={routes}
                renderRow={data => {
                  return (
                    <ListItem
                      button
                      onPress={() => this.props.navigation.navigate(data)}>
                      <Text>{data}</Text>
                    </ListItem>
                  );
                }}
              />
            </Content>
          </Container>
        );
      }
    }
    
    
    Steps
    • Obviously, Image component as shown in the section below that caused the problem.
    
      render() {
    ...
              <Image
                source={{
                  uri: "https://github.com/GeekyAnts/NativeBase-KitchenSink/raw/react-navigation/img/drawer-cover.png"
                }}
                style={{
                  height: 120,
                  alignSelf: "stretch",
                  justifyContent: "center",
                  alignItems: "center"
                }}>
    ...
        );
      }
    }
    
    
    • I fixed the issue with ImageBackground as shown in the section below, it works like a charm
    import React from "react";
    import { AppRegistry, Image, StatusBar, ImageBackground } from "react-native";
    import { Container, Content, Text, List, ListItem } from "native-base";
    const routes = ["Home", "Chat", "Profile"];
    
    export default class SideBar extends React.Component {
      render() {
        return (
          <Container>
            <Content>
              <ImageBackground
                source={require("../../images/drawer-cover.png")}
                style={{
                  height: 120,
                  alignSelf: "stretch",
                  justifyContent: "center",
                  alignItems: "center"
                }}>
                <Image
                  square
                  style={{ height: 80, width: 70 }}
                  source={require("../../images/logo.png")}
                />
              </ImageBackground>
              <List
                dataArray={routes}
                renderRow={data => {
                  return (
                    <ListItem
                      button
                      onPress={() => this.props.navigation.navigate(data)}>
                      <Text>{data}</Text>
                    </ListItem>
                  );
                }}
              />
            </Content>
          </Container>
        );
      }
    }


    Wednesday, February 6, 2019

    How to resolve "Invariant Violation: Text strings must be rendered within a component" error message during the React development?

    Software Required
    NPM version 6.4.1
    expo version 2.6.14
    Atom 1.34.0
    NativeBase 2.10.0. Please refer to link

    Problems

    • Run through NativeBase tutorial on Button, encounter the error message . Please refer to the screenshot below.
    • Below are my original source code
    import React, { Component } from 'react';
    import { Container, Header, Content, Button, Text } from 'native-base';
    import {Font, Expo, AppLoading} from 'expo';
    
    class ButtonSizeExample extends Component {
      state={
        isReady: false
      }
    
      async componentWillMount() {
        await Font.loadAsync({
          'Roboto': require('native-base/Fonts/Roboto.ttf'),
          'Roboto_medium': require('native-base/Fonts/Roboto_medium.ttf'),
        });
        this.setState({isReady:true})
      }
    
      render() {
        if (!this.state.isReady) {
          return <AppLoading />;
        }
    
        return (
          <Container>
            <Header />
            <Content>
              /*Small size button*/
              <Button small primary>
                <Text>Default Small</Text>
              </Button>
              /*Regular size button*/
              <Button success>
                <Text>Success Default</Text>
              </Button>
              /*Large size button*/
              <Button large dark>
                <Text>Dark Large</Text>
              </Button>
            </Content>
          </Container>
        );
      }
    }
    export default ButtonSizeExample;
    
    Steps
    • The root cause of the problem is caused by the comment /* Small ...*/ in the source code.
    
        return (
          <Container>
            <Header />
            <Content>
              /*Small size button*/
              ...
              /*Regular size button*/
              ...
              /*Large size button*/
              ...
            </Content>
          </Container>
        );
      }
    }
    export default ButtonSizeExample;
    
    • Remove those comment, it will work like a charm.
    import React, { Component } from 'react';
    import { Container, Header, Content, Button, Text } from 'native-base';
    import {Font, Expo, AppLoading} from 'expo';
    
    class ButtonSizeExample extends Component {
      state={
        isReady: false
      }
    
      async componentWillMount() {
        await Font.loadAsync({
          'Roboto': require('native-base/Fonts/Roboto.ttf'),
          'Roboto_medium': require('native-base/Fonts/Roboto_medium.ttf'),
        });
        this.setState({isReady:true})
      }
    
      render() {
        if (!this.state.isReady) {
          return <AppLoading />;
        }
    
        return (
          <Container>
            <Header />
            <Content>
              <Button small primary>
                <Text>Default Small</Text>
              </Button>
              <Button success>
                <Text>Success Default</Text>
              </Button>
              <Button large dark>
                <Text>Dark Large</Text>
              </Button>
            </Content>
          </Container>
        );
      }
    }
    export default ButtonSizeExample;


    Friday, February 1, 2019

    How to resolve header gap when integrate "NativeBase" ActionSheet into React Native project?

    Software Required
    NPM version 6.4.1
    expo version 2.6.14
    Atom 1.34.0
    NativeBase 2.10.0. Please refer to link
    react-navigation version 3.1.2

    Problems

    • Run through NativeBase tutorial on ActionSheet, encounter the gap at the header. Please refer to the screenshot below.
    Steps
    • Below are the source code of my App.js
    import React from "react";
    import { Root } from "native-base";
    import {createStackNavigator, createAppContainer} from "react-navigation";
    import ActionSheetIconExample from './src/component/ActionSheetIconExample';
    
    const NavStack = createStackNavigator(
      {
        Home: { screen: ActionSheetIconExample }
      }
    );
    
    const AppNavigator = createAppContainer(NavStack);
    
    export default () =>
      <Root>
        <AppNavigator />
      </Root>;
    • In order to resolve this issue, added a new code as shown below
    headerMode: 'none',
    
    • Below are the final source code that work
    import React from "react";
    import { Root } from "native-base";
    import {createStackNavigator, createAppContainer} from "react-navigation";
    import ActionSheetIconExample from './src/component/ActionSheetIconExample';
    
    const NavStack = createStackNavigator(
      {
        Home: { screen: ActionSheetIconExample }
      },
      {
        headerMode: 'none',
      }
    );
    
    const AppNavigator = createAppContainer(NavStack);
    
    export default () =>
      <Root>
        <AppNavigator />
      </Root>;
    
    
    • It will work like a charm after the single line of code being inserted. The while gap is missing.

    Thursday, January 31, 2019

    How to start your first React project?

    Software Required
    -NPM version 6.4.1
    -expo version 2.6.14
    -Atom 1.34.0
    -NativeBase 2.10.0. Please refer to link

    Note: React Native has too many dependencies and issues for a beginner like me. I have gone through those and it has burnt my many precious hours. Even though I decided to use NativeBase framework to speed up my development cycle but I still need to clear those hurdle that blocked me to get to the end result. I reused sample code from NativeBase as a very simple kickstart for beginners like me to avoid those unnecessary frustration.

    Steps
    • Run command below to create your first React navigation project.
    $ expo init AwesomeNativeBase
    
    • During the prompt of the "Choose a template", choose "> blank minimum dependencies to run and an empty root component" option
    • When project creation process is completed, change to "AwesomeNativeBase" directory, run the command below to install native-base component.
    $ npm install native-base --save
    
    • Run command below to install vector-icons.
    $ npm install @expo/vector-icons --save
    
    • Launch App.js using the Atom IDE. Paste the sample code as shown below
    import React, { Component } from 'react';
    import { StatusBar } from 'react-native';
    import { Container, Header, Title, Content, Footer, FooterTab, Button, Left, Right, Body, Icon, Text } from 'native-base';
    import {Font, Expo, AppLoading} from 'expo';
    
    export default class AnatomyExample extends Component {
      state={
        isReady: false
      }
    
      async componentWillMount() {
        await Font.loadAsync({
          'Roboto': require('native-base/Fonts/Roboto.ttf'),
          'Roboto_medium': require('native-base/Fonts/Roboto_medium.ttf'),
        });
        this.setState({isReady:true})
      }
    
      render() {
        if (!this.state.isReady) {
          return <AppLoading />;
        }
    
        return (
            <Container>
              <Header>
                <Left>
                  <Button transparent>
                    <Icon name='menu' />
                    </Button>
                </Left>
                <Body>
                  <Title>Header</Title>
                </Body>
                <Right />
              </Header>
              <Content>
                <Text>
                  This is Content Section
                </Text>
              </Content>
              <Footer>
                <FooterTab>
                  <Button full>
                    <Text>Footer</Text>
                  </Button>
                </FooterTab>
              </Footer>
              <StatusBar hidden />
            </Container>
        );
      }
    }
    
    • Back to your command prompt, enter command below to start your CLI.
    $ expo start
    
    • Expo Metro bundler will be launched. 

    • I'm using Expo Android client to conduct my testing. Please refer to link.
    • Make sure "Tunnel" is selected at the "Connection" field. Use the Expo Android client to scan the QR code, your application will be launched as shown in the screenshot below. 

    Friday, January 18, 2019

    How to resolve "Missing write access to /usr/local/lib/node_modules" when install expo-cli?

    Software Required
    - NPM version 6.4.1

    Problems
    • I'm exploring React and try to install expo-cli by executing command "npm install -g expo-cli", error as shown below is displayed
    npm WARN checkPermissions Missing write access to /usr/local/lib/node_modules
    npm ERR! path /usr/local/lib/node_modules
    npm ERR! code EACCES
    npm ERR! errno -13
    npm ERR! syscall access
    npm ERR! Error: EACCES: permission denied, access '/usr/local/lib/node_modules'
    npm ERR!  { [Error: EACCES: permission denied, access '/usr/local/lib/node_modules']
    npm ERR!   stack:
    npm ERR!    "Error: EACCES: permission denied, access '/usr/local/lib/node_modules'",
    npm ERR!   errno: -13,
    npm ERR!   code: 'EACCES',
    npm ERR!   syscall: 'access',
    npm ERR!   path: '/usr/local/lib/node_modules' }
    npm ERR! 
    npm ERR! The operation was rejected by your operating system.
    npm ERR! It is likely you do not have the permissions to access this file as the current user
    
    • I know this is a common problem and solutions is available over the internet, I think this is necessary to write a small little note for my own jot down.
    Steps
    • Run command below to resolve the permission problem
    $ mkdir ~/.npm-global
    $ npm config set prefix '~/.npm-global'
    $ export PATH=~/.npm-global/bin:$PATH
    $ source ~/.profile
    
    • Run command below to install expo-cli
    $ mkdir ~/.npm-global
    $ npm config set prefix '~/.npm-global'
    $ export PATH=~/.npm-global/bin:$PATH
    $ source ~/.profile
    $ npm install -g expo-cli
    
    • You are good to create your React project now.

    Thursday, January 17, 2019

    How to setup moodle development environment?

    Software Required
    - docker-compose version 1.22.0
    - macOS High Sierra
    - docker version 18.06.1-ce
    - Moodle 3.6.1

    Moodle source code and environment requirement
    • I'm using the Moodle 3.6.1 source code to configure my development environment. Below are the environment requirement by the Moodle 3.6.1 application
    Steps
    • Below are the folder structure to build my containers
    Parent
    |
    |-conf
    | |-mysql
    | | |-moodle.cnf (1)
    | |-php
    | | |-custom.php.ini (2)
    |-src
    | |-moodle (3)
    | | |- (All the Moodle source code)
    | |-scripts
    | | |-moodle.sql (4)
    |-Dockerfile (5)
    |-docker-compose.yml (6)
    • Refer to (5), I have a Dockerfile to configure both Apache, PHP and MySql in my container.  I have added the command to create the "/var/www/moodledata" folder.
    FROM php:7.0.33-apache 
    RUN docker-php-ext-install mysqli
    
    RUN mkdir /var/www/moodledata 
    RUN chmod 777 -R /var/www/moodledata
    
    
    • Refer to (6), it is my docker-compose.yml that I used to configure my application service.
    version: "2"
    services:
        www:
            build: .
            ports: 
                - "8001:80"
            volumes:
     (6-1)-->   - ./src/moodle:/var/www/html/ 
     (6-2)-->   - ./conf/php/custom.php.ini:/usr/local/etc/php/conf.d/custom.php.ini 
            links:
                - db
            networks:
                - default
        db:
            image: mysql:5.7.13
            ports: 
                - "3306:3306"
            environment:
                ALLOW_EMPTY_PASSWORD: "yes"
                MYSQL_DATABASE: moodle
                MYSQL_USER: user
                MYSQL_PASSWORD: test
                MYSQL_ROOT_PASSWORD: test
            volumes:
     (6-3)-->   - ./src/scripts/dump:/docker-entrypoint-initdb.d 
     (6-4)-->   - ./conf/mysql:/etc/mysql/conf.d
                - persistent:/var/lib/mysql
            networks:
                - default
        phpmyadmin:
            image: phpmyadmin/phpmyadmin
            links: 
                - db:db
            ports:
                - 8000:80
            environment:
                MYSQL_USER: user
                MYSQL_PASSWORD: test
                MYSQL_ROOT_PASSWORD: test
    volumes:
        persistent:
    
    
    • Refer to (6-1) in the docker-compose.yml, I have mounted the source code development folder to "./src/moodle" [Please refer to (3) at folder structure]. Please map your project directory from your favourite IDE to this folder. All the changes in the source code will be reflected in your development container immediately.
    • Refer to (6-2) in the docker-compose.yml, all the configuration for your php.ini will be placed in custom.php.ini file. I have mounted the container's php configuration into "./conf/php/custom.php.ini" [Please refer to (2) at folder structure]. Please refer to the content of my custom.php.ini as shown below. I have included the opcache configuration which is required by Moodle installation here.
    display_startup_errors=On
    log_errors=On
    
    zend_extension=opcache.so
    
    [opcache]
    opcache.enable = 1
    opcache.memory_consumption = 128
    opcache.max_accelerated_files = 10000
    opcache.revalidate_freq = 60
    
    ; Required for Moodle
    opcache.use_cwd = 1
    opcache.validate_timestamps = 1
    opcache.save_comments = 1
    opcache.enable_file_override = 0
    
    
    • Refer to (6-3) in the docker-compose.yml, I added my Moodle's DB dump (moodle.sql) at "./conf/mysql/" folder [Please refer to (4) at folder structure] on my local machine. I have mounted it to the container and all the SQL files place in this folder will be executed during the installation. Assumption: You have configured your Moodle with complete database.
    • Refer to (6-4) in the docker-compose.yml, all the customization for your my.cnf will be placed in "./conf/mysql/" folder [Please refer to (1) at folder structure]. For Moodle installation, I have created moodle.cnf and placed all my configuration in this file. Please refer to the content of my moodle.cnf as shown below.
    [client]
    default-character-set = utf8mb4
    
    [mysqld]
    innodb_file_format = Barracuda
    innodb_file_per_table = 1
    innodb_large_prefix
    
    character-set-server = utf8mb4
    collation-server = utf8mb4_unicode_ci
    skip-character-set-client-handshake
    
    [mysql]
    default-character-set = utf8mb4
    
    • Start the Moodle installation by executing command below. Browse to http://localhost:8001, your Moodle side is ready for use now.
    #docker-compose up
    
    Extra Tips: Clean docker container and image (Optional)
    $ docker stop $(docker ps -a -q)
    $ docker rm $(docker ps -a -q)
    $ docker rmi $(docker images -q)
    $ docker volume rm $(docker volume ls -q)

    Extra Tips: Explore the structure of the image in the container

    • Run command below to check the container ID
    $ docker ps
    • Based on the container ID that we get from the previous command, run command below to remote into the container to explore the file structure
    $docker exec -t -i [container id] /bin/bash

    Monday, January 14, 2019

    How to upload your source code to BitBucket?

    Software Required
    - git version 2.17.2 

    Precondition
    - BitBucket account has been registered
    - Source code repository has been created on BitBucket  

    Problems
    - I'm a SVN user who heavily rely on it to manage my source code version control. I'm a rookie to use Git on both GitHub/BitBucket platform.
    - During my Moodle and Dockers exploration, I decided to use BitBucket and git client to manage my source code.
    - The reason I choose BitBucket is it support:- 
    • Unlimited private repository 
    • Git/Mercurial.
    Steps
    - Assume you have BitBucket account and repository created.
    - Clone your empty repository from BitBucket into a source folder by executing the command below. Please fill in [username], [project name] and [repository] parameter based on the user account and repository name that you created at BitBucket.
    $ git clone https://[username]@bitbucket.org/[project name]/[repository].git
    - Copy your Moodle source code into the source folder
    - Run the command below to add all the new files into the staging area.
    $ git add .
    - Run command below to commit the source code in the staging area into the BitBucket repository with the description
    $ git commit -m "First commit"
    - Run command below to check on the branch and master differences
    $ git status

    On branch master Your branch is ahead of 'origin/master' by 1 commit. (use "git push" to publish your local commits)
    - If message "Your branch is ahead of 'origin/master' by 1 commit" is observed, run the command below to push the origin to master
    $ git push origin master
    - Check on the BitBucket console, all the source code is uploaded/committed successfully.


    How to turn on Moodle debug message on Dockers container?

    Software Required
    - docker-compose version 1.22.0
    - macOS High Sierra
    - docker version 18.06.1-ce
    Moodle version 3.6.1

    Problems
    - During the process of configuring Moodle on my Docker container, encountered the error message "Error reading from database" when launching my Moodle portal. I can't launch the Moodle main login page.
    - I can't proceed from there and have no clue on what is going on that blocked the system from launching.
    - I need more details through the Moodle debug message

    Steps
    - Came across Moodle support side, it provided steps to turn on the Moodle debug message. However, it does not provide the configuration details on Dockers.
    - I'm using docker-compose, hence, I added configuration below to my docker-compose.yml file
    volumes: - ./phpconf/custom.php.ini:/usr/local/etc/php/conf.d/custom.php.ini
    - I created "phpconf" folder in my docker-compose parent folder and place "custom.php.ini" file in the folder.
    - Below are the content of the "custom.php.ini" file. 
    display_startup_errors=On
    log_errors=On
    - Added configuration below in the Moodle config.php
    ini_set ('display_errors', 'on');
    ini_set ('log_errors', 'on');
    ini_set ('display_startup_errors', 'on');
    ini_set ('error_reporting', E_ALL);
    $CFG->debug = 30719; // DEBUG_ALL, but that constant is not defined here

    //The configuration must above this line
    require_once(__DIR__ . '/lib/setup.php');
    - Restart the docker-compose by running the command below
    #docker-compose down
    #docker-compose kill
    #docker-compose up
    - Refresh the Moodle page, error message "Table "sessions" does not exist" is displayed. Obviously, the DB dump that I used to restore the database in Dockers MySQL database is not complete. 
    - In order to check the configuration has been taken effect in the php.ini file, add phpinfo() into config.php. Reload the page, you will be able to confirm the implementation has been taken effect.


    Wednesday, January 2, 2019

    How to resolve Intl extension enabling issue when install Moodle on XAMPP?

    Software Required

    - macOS High Sierra
    - XAMPP 7.0.33 / PHP 7.0.33. Please refer to download
    - Moodle version 3.6.1. Please refer to download

    Problem
    • During the Moodle installation on XAMPP, Intl extension checking message is displayed. Please refer to the screenshot below

    Steps
    • To check the location of php.ini, browse to http://localhost/dashboard/phpinfo.php
    • Obviously, php.ini is located at "/Applications/XAMPP/xamppfiles/etc/" directory
    • Run command below to check the php path
    which php
    • Run command below to change the PHP path to XAMPP PHP folder if default path is "/usr/bin/php"
    PATH="/Applications/XAMPP/xamppfiles/bin:${PATH}"
    • Run command below to generate Intl extension
    brew tap kyslik/homebrew-php
    brew install kyslik/php/php70-intl
      • Alter php.ini by inserting the configuration as shown below
      extension="/usr/local/Cellar/php70-intl/7.0.27_25/intl.so"
          • Press "Reload" button, the Intl extension error will be resolved. 

          Tuesday, January 1, 2019

          How to resolve mysql_full_unicode_support error when deploy Moodle on XAMPP?

          Software Required

          - macOS High Sierra
          - XAMPP-VM/PHP 7.3.0. Please refer to download
          - Moodle version 3.6.1

          Problem

          • During the Moodle installation on XAMPP, mysql_full_unicode_support error message is prompted. Please refer to the screenshot below
          • "Barracuda file format" and "full support of UTF-8 on MySql" errors need to be fixed.
          Steps
          • Locate my.cnf that located at "/opt/lampp/etc/" directory. Insert the configuration as shown below
          [client]
          default-character-set = utf8mb4
          
          [mysqld]
          innodb_file_format = Barracuda
          innodb_file_per_table = 1
          innodb_large_prefix
          
          character-set-server = utf8mb4
          collation-server = utf8mb4_unicode_ci
          skip-character-set-client-handshake
          
          [mysql]
          default-character-set = utf8mb4
          
          
                • Restart MySql server. Done!