Setting Up Your Webhook
Prerequisite
Note: Facebook has provided a very details step by step guide. This is for my own note taking and reference
- Install Node.js https://nodejs.org/en/
- Install the curl download
- Run the command below to setup the webhook:-
mkdir messenger-webhook         // Creates a project directory
cd messenger-webhook            // Navigates to the new directory
touch index.js                  // Creates empty index.js file.
npm init                        // Creates package.json. Accept default for all questions.
npm install express body-parser --save // Installs the express.js http server framework module and then adds them to the dependencies section of package.json file.
- Below are the folder structure and files in messenger-webhook directory
index.js
node_modules
package.json
- Download the source code from download and replace the source code to index.js
- Start the webhook on localhost
node index.js
- Command below to test the webhook
curl -X GET "localhost:1337/webhook?hub.verify_token=&hub.challenge=CHALLENGE_ACCEPTED&hub.mode=subscribe"
curl -H "Content-Type: application/json" -X POST "localhost:1337/webhook" -d '{"object": "page", "entry": [{"messaging": [{"message": "TEST_MESSAGE"}]}]}'
Create a New Facebook page
- Login into Facebook account
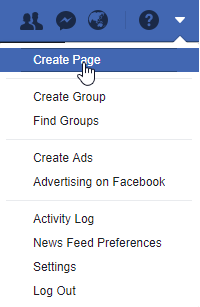
- Select "Create Page" option in the drop down menu
- Select "Community or Public Figure", click "Get Started" button
- Enter "Uncle Lubang" in the "Page Name".
- Select "Computers & Internet Website" in the "Category" field.
- Click on "Continue" button
- Click both "Skip" button twice to create the page.
Create Facebook App
- Browse to Facebook developers, click on "Register Now" button to register developer account.
- Follow the "Wizard" to register developer account and create app
- Create the app with the name as "Uncle Lubang".
Add Contact Facebook Page Through Messenger
Transform localhost into https URL (Ensure https is enable and you wish to use your desktop at home)
- Download ngrok from download
- Unzip the file and run the command as described below. My port used is 1337.
- Below is the sample result
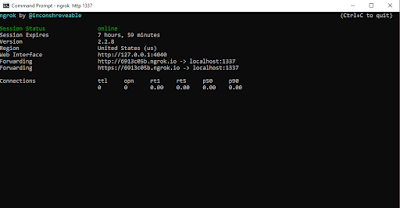
- Unzip the file and run the command as described below. The port I used is 1337
- Based on the forwarding URL generated, "http://6913c05b.ngrok.io" will be used for Facebook configuration
Deploy webhook on Glitch
- Launch your project from Glitch
- Sample code in App.js
'use strict';

// Imports dependencies and set up http server
const
  request = require('request'),
  express = require('express'),
  bodyParser = require('body-parser'),
  PAGE_ACCESS_TOKEN = process.env.PAGE_ACCESS_TOKEN,
  app = express().use(bodyParser.json()); // creates express http server

// Sets server port and logs message on success
app.listen(process.env.PORT || 80, () => console.log('webhook is listening'));

// Creates the endpoint for our webhook
app.post('/webhook', (req, res) => {

  let body = req.body;

  // Checks this is an event from a page subscription
  if (body.object === 'page') {

    // Iterates over each entry - there may be multiple if batched
    body.entry.forEach(function(entry) {

      // Gets the message. entry.messaging is an array, but
      // will only ever contain one message, so we get index 0
      let webhook_event = entry.messaging[0];
      console.log(webhook_event);

      // Get the sender PSID
      let sender_psid = webhook_event.sender.id;
      console.log('Sender PSID: ' + sender_psid);

      // Check if the event is a message or postback and
      // pass the event to the appropriate handler function
      if (webhook_event.message) {
        handleMessage(sender_psid, webhook_event.message);
      } else if (webhook_event.postback) {
        handlePostback(sender_psid, webhook_event.postback);
      }
    });

    // Returns a '200 OK' response to all requests
    res.status(200).send('EVENT_RECEIVED');
  } else {
    // Returns a '404 Not Found' if event is not from a page subscription
    res.sendStatus(404);
  }

});

// Adds support for GET requests to our webhook
app.get('/webhook', (req, res) => {

  // Your verify token. Should be a random string.
  let VERIFY_TOKEN = "[PAGE_TOKEN]"

  // Parse the query params
  let mode = req.query['hub.mode'];
  let token = req.query['hub.verify_token'];
  let challenge = req.query['hub.challenge'];

  // Checks if a token and mode is in the query string of the request
  if (mode && token) {

    // Checks the mode and token sent is correct
    if (mode === 'subscribe' && token === VERIFY_TOKEN) {

      // Responds with the challenge token from the request
      console.log('WEBHOOK_VERIFIED');
      res.status(200).send(challenge);

    } else {
      // Responds with '403 Forbidden' if verify tokens do not match
      res.sendStatus(403);
    }
  }
});

// Handles messages events
function handleMessage(sender_psid, received_message) {
  let response;

  // Check if the message contains text
  if (received_message.text) {
    // Create the payload for a basic text message
    response = {
      "text": `You sent the message: "${received_message.text}". Now send me an image!`
    }
  }

  // Sends the response message
  callSendAPI(sender_psid, response);
}

// Handles messaging_postbacks events
function handlePostback(sender_psid, received_postback) {

}

// Sends response messages via the Send API
function callSendAPI(sender_psid, response) {
   // Construct the message body
    let request_body = {
      "recipient": {
        "id": sender_psid
      },
      "message": response
    }

    // Send the HTTP request to the Messenger Platform
    request({
    "uri": "https://graph.facebook.com/v2.6/me/messages",
    "qs": { "access_token": PAGE_ACCESS_TOKEN },
    "method": "POST",
    "json": request_body
  }, (err, res, body) => {
    if (!err) {
      console.log('message sent!')
    } else {
      console.error("Unable to send message:" + err);
    }
  });
}
- Sample code in package.json
{
  "name": "messenger-quick-start",
  "version": "1.0.0",
  "description": "An example webhook for Facebook Messenger quick start tutorial.",
  "main": "app.js",
  "scripts": {
    "start": "node app.js"
  },
  "repository": {
    "type": "git",
    "url": "https://github.com/fbsamples/messenger-platform-samples.git"
  },
  "author": "Facebook",
  "license": "ISC",
  "dependencies": {
    "body-parser": "^1.15.0",
    "express": "^4.13.4",
    "request": "^2.72.0"
  },
  "engines": {
    "node": "~4.1.2"
  }
}
Facebook webhook configuration
- Launch the Facebook dashboard to "My Apps" section, select "Uncle Lubang" app.
- Scroll to "Token Generation" section, select "Uncle Lubang" page.
- Follow the steps from wizard to generate the token.
- Scroll to "Webhooks" section, click on the "Setup Webhooks" button to launch. Fill in the Callback URL, Verify Token and check "messages", "messaging_postbacks" and "messaging_optins" checkbox.
Test the ChatBot


