Saturday, October 19, 2013

How to resolve "You don't have administrator rights! freeSSHd will close!" error message while launch freeSSHd?

Setup SSH server using freeSSHd 1.2.6 on my machine running on Window 7. Error message "You don't have administrator rights! freeSSHd will close!" keep prompting when the app is launched.


Below are the steps to resolve this issue
1. Download OllyDbg from http://ollydbg.de/. Launch the app


2. Open "FreeSSHDService.exe" as displayed in the screenshot below.
Note: The file located at the FreeSSHd installation folder


3. Press Ctrl+G and search for address "0041312A"


4. Right click on the selected "0041312A" address, select "Binary" -> "Edit" menu.


5. Change "HEX +00" field value from "74 49" to "90 90". Click on Ok button.


6. Right click on the modified address, select "Copy to executable" -> "Selection" menu.


7. A new exe will be generated. Right click on any boundaries of the window,select "Save File" menu.


8. Overwrite the existing "FreeSSHDService.exe", launch the app, you can find FreeSSHD icon in the system tray..


Tuesday, October 15, 2013

How to migrate MySql data files to other folder/drive?

Let's say you have installed an application that make used of the mysql database and you have completed the installation in a particular folder/drive. Now, you wish to migrate the data storing location to other folder/drive. In order to migrate MySql data files location, below are the details steps :-

Environment
OS: Window 7 Enterprise
MySQL: MySQL version 5.6.12

Assumption
MySQL home directory : [MYSQL_HOME]
MySQL new data files directory : [NEW_DATA_FOLDER]

1. Shutdown MySQL database
2. Copy the "data" folder that normally located at [MYSQL_HOME]\data to new data files directory, [MY_NEW_DATA], for example, "d:\data".
3. Open my.ini that located at [MYSQL_HOME]\my.ini
4. Edit the my.ini by changing the parameter as describe below:
datadir=[NEW_DATA_FOLDER]
5. Restart the MySql database server, that's it!

Thursday, October 3, 2013

How to send email through telnet command to SMTP server?

Assumption
SMTP Server : [SMTP_SERVER]
Client Machine Name : [CLIENT_MACHINE_NAME]
Email From: [EMAIL_FROM]
Email Recipient: [RCPT_TO]

Steps to use telnet command to send email through SMTP server

1. Type in telnet command as described below to connect to the SMTP server.
telnet [SMTP_SERVER] 25
2. Type in the command below to introduce yourself to the SMTP server. For example, "hello localhost"
helo [CLIENT_MACHINE_NAME]
3. Type in the command as described below to set the email address that used to send email.
MAIL FROM:[EMAIL_FROM]
4. Type in the command below to set the recipient gmail id
RCPT TO:[RCPT_TO]
5. Enter the command "DATA" to proceed with composing the email body.
DATA
6. Enter the email body and follow by '.' to trigger email sending
Hello Testing!
.

Tuesday, October 1, 2013

Issue encounter and simple note on PostgreSQL exploration

How to export and import sqldump file into PostgreSQL database?

Note: 2 format types of sqldump that PostgreSql can produce :-
- copy format
- sql format

In case to avoid problems that I encountered by using "copy" format, I advice to use "sql" format.

For my scenario, I use phpPgAdmin to export sqldump. Below are the steps to export sqldump from the source of the database server and import to the target of the database server:
1. Login through phpPgAdmin to access the source database server.
2. Tap on database name in the left menu
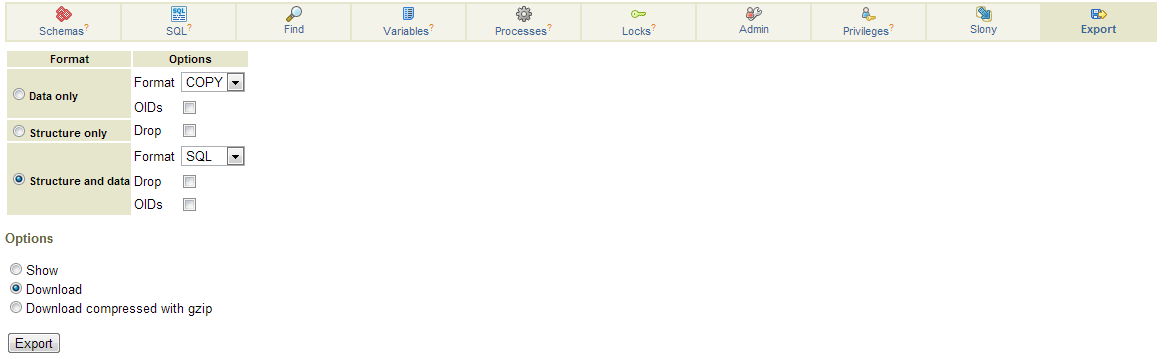
3. Tap on "Export" tab in the right hand screen
4. Select "Structure & Data" option with "SQL" format as displayed in the screen below


5. Click on "Export" button, sqldump file in sql extension will be downloaded.
6. Use pgAdminIII tool, create the database in your new target database server.
7. Open the query editor, open the sqldump script and execute the script.
8. Tables structure will be created and all the data will be imported to the target database server.

How to export database schema with command line?

Assume the parameters below represent
Database User ID: [USER_ID]
Database Name: [DATABASE_NAME]
SQL output file: [SQL_FILE]
pg_dump --schema-only -U [USER_ID] [DATABASE_NAME] > [SQL_FILE]
Note: Applicable on Linux

How to export database dump and import into newly created database?

Assume the parameters below represent
Database user id, for example, 'postgres' : [DB_USER_LOGIN]
Database name, for example, 'mydatabase' : [DATABASE_NAME]
Database dump file, for example, 'dump.sql' : [DATABASE_DUMP_FILE]

1. Export database dump from source database using the command as described below (Without copy owner and privileges)
pg_dump --no-owner --no-privileges -U [DB_USER_LOGIN] [DATABASE_NAME] > [DATABASE_DUMP_FILE]
2. Create [DATABASE_NAME] database in your POSTGRES database server

3. Import database dump to the target database using the command as described below
psql -U [DB_USER_LOGIN] [DATABASE_NAME] < [DATABASE_DUMP_FILE]
How to create users and new PostgreSQL database through command line?

Assume the parameters below represent
New user id, for example, 'george' : [NEW_DB_USER_LOGIN]
New user password, for example, '12345678' : [NEW_DB_USER_PASSWORD]
New Database name, for example, 'mydatabase' : [NEW_DATABASE_NAME]

1. In the Linux terminal, type in the command below to add new user
adduser [NEW_DB_USER_LOGIN]
Note: If command not found error message is prompted when 'adduser' is used, type in '/usr/sbin/adduser' to create user.

 2. Use the command below to reset the new user's password
passwd [NEW_DB_USER_LOGIN]
3. Create a new database based on the database template1
psql -d template1 -U postgres
4. Create new user
template1=#CREATE USER [NEW_DB_USER_LOGIN] WITH PASSWORD '[NEW_DB_USER_PASSWORD]';
5. Create new database
template1=#CREATE DATABASE [NEW_DATABASE_NAME];
6. Grant new user access right to the new database
template1=#GRANT ALL PRIVILEGES ON DATABASE [NEW_DATABASE_NAME] to [NEW_DB_USER_LOGIN];
7. Type in '\q' to quit the template1.

How to get your PHPMailer sample code to work properly with your SMTP Server?

Download PHPMailer recently to test on email sending through SMTP server, out of no luck, it just can't send email through the SMTP server  (Microsoft ESMTP MAIL Service, Version: 5.0.2195.738).

Assume the parameters below represent

SMTP Server: [SMTP_SERVER]
Client Server Name: [CLIENT_SERVER_NAME]

Configure all the necessary parameter in SMTP.php class provided by PHPMailer in examples folder, out of no luck, it just can't send email. Turn on the SMTP debug parameters in SMTP.php

// 0 = off (for production use)
// 1 = client messages
// 2 = client and server messages
$mail->SMTPDebug  = 2;
The debug messages are displayed as described below:
SMTP -> FROM SERVER:220 [SMTP_SERVER] Microsoft ESMTP MAIL Service, Version: 5.0.2195.7381 ready at Mon, 23 Sep 2013 14:38:12 +0800 
CLIENT -> SMTP: EHLO [[CLIENT_SERVER_NAME]]
SMTP -> FROM SERVER: 501 5.5.4 Invalid Address
SMTP -> ERROR: EHLO not accepted from server: 501 5.5.4 Invalid Address
CLIENT -> SMTP: HELO [[CLIENT_SERVER_NAME]]
SMTP -> FROM SERVER: 501 5.5.4 Invalid Address
SMTP -> ERROR: HELO not accepted from server: 501 5.5.4 Invalid Address
CLIENT -> SMTP: AUTH LOGIN
SMTP -> ERROR: AUTH not accepted from server: 503 5.5.2 Send hello first
CLIENT -> SMTP: quit
SMTP -> FROM SERVER:221 2.0.0 [SMTP_SERVER] Service closing transmission channel
SMTP Connect() failed.
Mailer Error: SMTP Connect() failed.
Refer to the debug messages, message "Invalid Address" is keep prompting.

Troubleshoot the debug message and discovered that special character '[' and ']' is appended to the [SMTP_SERVER_NAME] value.

Comment out 5 lines of source code at line 720  in "class.smtp.php" as described below and replace with a new 5 lines of source code as described below that removed '[' and ']' characters:
    //if(!$this->SendHello('EHLO', "[" . $host . "]")) {
    //  if(!$this->SendHello('HELO', "[" . $host . "]")) {
    //    return false;
    //  }
    //}
 
    if(!$this->SendHello('EHLO', $host)) {
      if(!$this->SendHello('HELO',$host)) {
        return false;
      }
    }
Try to resend email, it just work like a charm!

Thursday, September 12, 2013

How to configure PHPUnit and Aptana Studio 3?

Try to get PHPUnit integrated with Aptana Studio 3 for my unit testing, discover that it is not straight forward. Aptana Studio 3 is not ready for that kind of tight integration. I have to make use of "External Tools" on Aptana Studio to launch PHPUnit through DOS command.

Assumption
- PEAR has been installed
- Running on Window 7
- Download PHPUnit 3.7.25 from https://github.com/sebastianbergmann/phpunit/ ("phpunit.phar" will be downloaded)
- Follow the Zend 2 sample tutorial to prepare the unit testing script http://framework.zend.com/manual/2.0/en/user-guide/unit-testing.html

Steps to configure

1. Install phpunit on your machine by running the command as described below in "Command Prompt" window with phpunit.phar in the same directory.
  
pear config-set auto_discover 1
pear install pear.phpunit.de/PHPUnit
2. Once phpunit has been installed, phpunit.bat file will be created in [PEAR_INSTALL_PATH]. Launch the "Command Prompt" window and type in the command as described below to check the version of PHPUnit.
phpunit --version
PHPUnit 3.7.25 by Sebastian Bergmann.
Note: "phpunit" command is working provided you right click "Command Prompt" icon and select "Run as administrator" to launch the "Command Prompt" window.

3. In Aptana Studio 3.0, "External Tools" menu will not be available in the "Run" menu. Steps as described below are required to turn on the "External Tools" option.
- Right click the "Web Perspective" and select "Customize" menu, "Customize Perspective" screen will be displayed.


- Select "Command Groups Availability" tab and check the "External Tools" check box as shown in the screenshots below.

- Click on "Ok" button to dismiss the "Customize Perspective" screen. Click on "Run" menu, "External Tools" will be displayed.

4. Select "Run" ->  "External Tools" -> "External Tools Configuration", the configuration screen will be displayed.


5. Fill in the details as described below
Name: PHPUnit

Location: [PEAR_INSTALL_PATH]\phpunit.bat
Note: Normally phpunit.bat is located at the PEAR installation path if PEAR is used to install PHPUnit.

Working Directory: ${project_loc}/module/Application/test
Note: Based on the tutorial provided by Zend2, http://framework.zend.com/manual/2.0/en/user-guide/unit-testing.html, this should be the folder that consists of "phpunit.xml.dist" file.

6. Select unit testing class, for example, "IndexControllerText.php", click on "Run" -> "External Tools" -> "PHPUnit", the unit testing script will be executed and test result will be output to "Console" screen.

Friday, September 6, 2013

Issue encounter and simple note on Mantis exploration

System Environment
Mantis Version: 1.2.15
WAMP version 2.4

How to configure email notification on Mantis using Gmail SMTP Server?

Note: Assume Gmail account has been created

Steps to resolve
1. Open config_defaults_inc.php, edit the parameters as described below:
/**
  * Allow email notification.
  * Set to ON to enable email notifications, OFF to disable them. Note that
  * disabling email notifications has no effect on emails generated as part
  * of the user signup process. When set to OFF, the password reset feature
  * is disabled. Additionally, notifications of administrators updating
  * accounts are not sent to users.
  * @global int $g_enable_email_notification
*/
$g_enable_email_notification = ON;

/**
  * select the method to mail by:
  * PHPMAILER_METHOD_MAIL - mail()
  * PHPMAILER_METHOD_SENDMAIL - sendmail
  * PHPMAILER_METHOD_SMTP - SMTP
  * @global int $g_phpMailer_method
*/
$g_phpMailer_method = PHPMAILER_METHOD_SMTP;

/**
  * This option allows you to use a remote SMTP host.  Must use the phpMailer script
  * One or more hosts, separated by a semicolon, can be listed.
  * You can also specify a different port for each host by using this
  * format: [hostname:port] (e.g. "smtp1.example.com:25;smtp2.example.com").
  * Hosts will be tried in order.
  * @global string $g_smtp_host
*/
$g_smtp_host = 'smtp.gmail.com';

/**
  * These options allow you to use SMTP Authentication when you use a remote
  * SMTP host with phpMailer.  If smtp_username is not '' then the username
  * and password will be used when logging in to the SMTP server.
  * @global string $g_smtp_username
*/
$g_smtp_username = '[GMAIL_ACCT_ID]';

/**
  * SMTP Server Authentication password
  * @global string $g_smtp_password
*/
$g_smtp_password = '[GMAIL_ACCT_PASSWD]';

/**
  * This control the connection mode to SMTP server. Can be 'ssl' or 'tls'
  * @global string $g_smtp_connection_mode
*/
$g_smtp_connection_mode = 'ssl';

/**
  * The smtp port to use.  The typical SMTP ports are 25 and 587.  The port to use
  * will depend on the SMTP server configuration and hence others may be used.
  * @global int $g_smtp_port
*/
$g_smtp_port = 465;

How to send email using simple SMTP command through Gmail SMTP Server?

Note: 
- Assume Perl is installed on your machine to encode both user id and password in base64.
- Assume OpenSSL is available on your machine

Steps to resolve

1. Using openssl to direct connect to the Gmail SMTP server, a SSL handshaking will be executed.
openssl s_client -connect smtp.gmail.com:465 -crlf -ign_eof

2. Type in the command below to introduce yourself to the mail server.
ehlo [MY_DOMAIN] //Note: ehlo localhost

3. Before hand, please use Perl on another command prompt to encode both your [GMAIL_USER_ID] and [GMAIL_USER_PASSWORD] into base64. Below are the command helping you to generate encoded user id and password for authentication purpose.
perl -MMIME::Base64 -e "print encode_base64(qq(\000[GMAIL_USER_ID]\@gmail.com\000[GMAIL_USER_PASSWORD]))"
Once the command has been executed, you will get an encoded output, let's assume it as [BASE64_USERID_PASSWORD]

4. Back to your SMTP command prompt, type in the command as shown below to pass the authentication
AUTH PLAIN [BASE64_USERID_PASSWORD]
Response "2.7.0 Accepted" will be prompted

5. Type in the command below to set the sender gmail id
MAIL FROM: <[SENDER_GMAIL_ID]@gmail.com>

6. Type in the command below to set the recipient gmail id
RCPT TO: <[RECIPIENT_GMAIL_ID]@gmail.com>

7. Enter the command "DATA" to proceed with composing the email subject and body.
DATA

8. Enter the email body and subject based on the description and shown below
Subject: Hello Testing

Hello Testing!
.
Note: The '.' is represented the email composing has been completed and trigger sent command

How to resolve Mantis email problem when WAMP 2.4 is used?

Configure email notification on Mantis that run on WAMP 2.4 through Gmail SMTP server, always unable to send email. Have a further investigation, discovered that I need to turn on php_openssl in my WAMP PHP extensions. When turn on the php_openssl extension, encounter the error as shown in the log file.
[Mon Sep 09 14:57:33.670249 2013] [mpm_winnt:notice] [pid 1544:tid 352] AH00418: Parent: Created child process 2280
[Mon Sep 09 14:57:34.174249 2013] [ssl:warn] [pid 2280:tid 244] AH01882: Init: this version of mod_ssl was compiled against a newer library (OpenSSL 1.0.1e 11 Feb 2013, version currently loaded is OpenSSL 1.0.1d 5 Feb 2013) - may result in undefined or erroneous behavior
[Mon Sep 09 14:57:34.909049 2013] [ssl:warn] [pid 2280:tid 244] AH01882: Init: this version of mod_ssl was compiled against a newer library (OpenSSL 1.0.1e 11 Feb 2013, version currently loaded is OpenSSL 1.0.1d 5 Feb 2013) - may result in undefined or erroneous behavior
[Mon Sep 09 14:57:35.824849 2013] [ssl:warn] [pid 2280:tid 244] AH01873: Init: Session Cache is not configured [hint: SSLSessionCache]
From the error log, seems like OpenSSL version is not correct and I found out the hyperlink as described below to explain steps to upgrade the OpenSSL version.

http://stackoverflow.com/questions/17354788/enabling-openssl-in-wamp

Once the OpenSSL version is upgraded to version OpenSSL 1.0.1e, I am able to turn on php_openssl in my WAMP PHP extensions and finally email notification is working in my Mantis installation.

How to turn on LDAP authentication on Mantis?

To turn on the LDAP authentication on Mantis that normally required by corporate users, below are some tips on how to achieve it.

Steps to resolve

1. Open config_defaults_inc.php, edit the parameters as described below:
/**
* login method
* MD5, LDAP, BASIC_AUTH or HTTP_AUTH.
* Note: you may not be able to easily switch encryption methods, so this
* should be carefully chosen at install time. However, MantisBT will attempt
* to "fall back" to older methods if possible.
* @global int $g_login_method
*/
$g_login_method = LDAP;

//Examples, ldap://ldap.example.com:389
$g_ldap_server = 'ldap://[LDAP_SERVER]:389';


//Examples, dc=employee,dc=it,dc=departmentname,dc=companyname
//Note: Please use the most exact DN instead of global DN. Otherwise,
//Mantis will keep throwing empty response and the application will always 
//show empty page
$g_ldap_root_dn = '[LDAP_DN_PARAMETER]';

//Use sAMAccountName for Active Directory
$g_ldap_uid_field = 'sAMAccountName';

/**
* The distinguished of the user account to use for binding to the LDAP server.
* For example, 'CN=ldap,OU=Administrators,DC=example,DC=com'.
*
* @global string $g_ldap_bind_dn
*/
$g_ldap_bind_dn = '[DOMAIN_NAME]\[USERNAME]';

/**
* The password for the service account to be used for connecting to the LDAP server.
*
* @global string $g_ldap_bind_passwd
*/
$g_ldap_bind_passwd = '[PASSWORD]';

/**
* Should we send to the LDAP email address or what MySql tells us
* @global int $g_use_ldap_email
*/
$g_use_ldap_email = ON;

/**
* The LDAP Protocol Version, if 0, then the protocol version is not set.  For Active Directory use version 3.
*
* @global int $g_ldap_protocol_version
*/
$g_ldap_protocol_version = 3;

How to turn on debug message in Mantis for LDAP troubleshooting?

To turn on the debug message for LDAP troubleshooting, below are the steps and configuration that are required

Steps to resolve
1. Open php.ini which is located at "[WAMP_INSTALL_PATH]\bin\apache\Apache2.4.4\bin".
2. Uncomment 'error_log = "[WAMP_INSTALL_PATH]/logs/php_error.log"'
3. Open config_defaults_inc.php in Mantis, change the value of g_log_level to LOG_LDAP
$g_log_level = LOG_LDAP;
Restart your WAMP server, LDAP log will be available at [WAMP_INSTALL_PATH]\logs\php_error.log.

How to reset your mysql user account password through command line?

Open your mysql browser, type in the command as displayed below

UPDATE mysql.user SET Password=PASSWORD('[MyNewPass]') WHERE User='root';
FLUSH PRIVILEGES;
Relogin again.