Saturday, November 10, 2018

How to resolve minikube hang issue after the start?

Software Required

- MiniKube version 0.30.0
- macOS High Sierra
  • Install MiniKube on my Mac machine, encounter a hang issue after I triggered the command below
minukube start
  • The application always stop at "Starting cluster components" 
Starting local Kubernetes v1.10.0 cluster...
Starting VM...
Getting VM IP address...
Moving files into cluster...
Setting up certs...
Connecting to cluster...
Setting up kubeconfig...
Starting cluster components...
  • In order to resolve this problem, run the command below to delete the machine, it will work like a charm
minikube delete && minikube start

Sunday, October 28, 2018

How to setup Facebook ChatBot (2) ?


Note: Facebook has provided a very details step by step guide. This is for my own note taking and reference

Based on the previous tutorial, we know the steps and configuration that we need to perform to create Facebook Chatbot. However, it still lack of human intelligent to interact with human being.

In order to enable the Facebook chatbot to understand your question and respond intelligently, a backend system with machine learning and natural language processing (NLP) is required. We have selected DialogFlow as the platform which powered by Google, as the platform to allow us to explore the Chatbot and AI technology.

Prerequisite
- Register an account at DialogFlow


Create the DialogFlow Agent


- Click on the dropdown menu at the left menu, select create new agent menu. Fill in the information


- Fill in the information as listed below:
  • Agent Name - A name to identified the agent
  • Default Language - I used English
  • Default time zone - Depends on your location
- Click on "Create" button, agent will be created.  A google project will be created as well.

- Select "Small Talk" at the menu, check enable checkbox. 


- Click on "Integrations" at the left menu to launch the "Integration" listing


- Click on "Facebook Messenger", enter the token from Facebook messenger into the "Verify Token" and "Page Access Token" fields. Copy the "Callback URL" and paste it into Facebook messenger.


- Login to Facebook developer console, click on "Webhooks" at the left menu, click on "Edit Subscription" button. Paste the url from "Dialog flow" and paste into "Callback URL" field.


- Now, the Facebook messenger able to answer the simple question. Please refer to the screenshot below.


Saturday, October 27, 2018

How to setup Facebook ChatBot (1) ?

Setting Up Your Webhook

Prerequisite

Note: Facebook has provided a very details step by step guide. This is for my own note taking and reference

- Install Node.js https://nodejs.org/en/
- Install the curl download 
- Run the command below to setup the webhook:-
mkdir messenger-webhook         // Creates a project directory
cd messenger-webhook            // Navigates to the new directory
touch index.js                  // Creates empty index.js file.
npm init                        // Creates package.json. Accept default for all questions.
npm install express body-parser --save // Installs the express.js http server framework module and then adds them to the dependencies section of package.json file.  
- Below are the folder structure and files in messenger-webhook directory
index.js 
node_modules
package.json
- Download the source code from download and replace the source code to index.js
- Start the webhook on localhost

node index.js
- Command below to test the webhook

curl -X GET "localhost:1337/webhook?hub.verify_token=&hub.challenge=CHALLENGE_ACCEPTED&hub.mode=subscribe"

curl -H "Content-Type: application/json" -X POST "localhost:1337/webhook" -d '{"object": "page", "entry": [{"messaging": [{"message": "TEST_MESSAGE"}]}]}'
Create a New Facebook page
  • Login into Facebook account
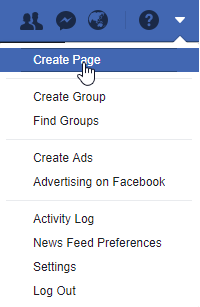
  • Select "Create Page" option in the drop down menu

  • Select "Community or Public Figure", click "Get Started" button
  • Enter "Uncle Lubang" in the "Page Name".
  • Select "Computers & Internet Website" in the "Category" field.
  • Click on "Continue" button
  • Click both "Skip" button twice to create the page.
Create Facebook App

  • Browse to Facebook developers, click on "Register Now" button to register developer account.
  • Follow the "Wizard" to register developer account and create app
  • Create the app with the name as "Uncle Lubang".

Add Contact Facebook Page Through Messenger

  • Browse to the page, click on the "Add a Button" button

  • Select "Send Message" in the "Contact You" section. Click "Next" button

  • Select "Messenger" and follow by "Finish" button

  • Hover the mouse towards the "Send Message" button on the page, click on "Test Button" menu. Facebook messenger box will be displayed.


Transform localhost into https URL (Ensure https is enable and you wish to use your desktop at home)

  • Download ngrok from download
  • Unzip the file and run the command as described below. My port used is 1337.
ngrok http 1337

  • Below is the sample result

  • Unzip the file and run the command as described below. The port I used is 1337
  • Based on the forwarding URL generated, "http://6913c05b.ngrok.io" will be used for Facebook configuration

Deploy webhook on Glitch

  • Launch your project from Glitch
  • Sample code in App.js
'use strict';

// Imports dependencies and set up http server
const
  request = require('request'),
  express = require('express'),
  bodyParser = require('body-parser'),
  PAGE_ACCESS_TOKEN = process.env.PAGE_ACCESS_TOKEN,    
  app = express().use(bodyParser.json()); // creates express http server

// Sets server port and logs message on success
app.listen(process.env.PORT || 80, () => console.log('webhook is listening'));

// Creates the endpoint for our webhook 
app.post('/webhook', (req, res) => {  
 
  let body = req.body;

  // Checks this is an event from a page subscription
  if (body.object === 'page') {

    // Iterates over each entry - there may be multiple if batched
    body.entry.forEach(function(entry) {

      // Gets the message. entry.messaging is an array, but 
      // will only ever contain one message, so we get index 0
      let webhook_event = entry.messaging[0];
      console.log(webhook_event);
      
      // Get the sender PSID
      let sender_psid = webhook_event.sender.id;
      console.log('Sender PSID: ' + sender_psid);
      
      // Check if the event is a message or postback and
      // pass the event to the appropriate handler function
      if (webhook_event.message) {
        handleMessage(sender_psid, webhook_event.message);        
      } else if (webhook_event.postback) {
        handlePostback(sender_psid, webhook_event.postback);
      }      
    });

    // Returns a '200 OK' response to all requests
    res.status(200).send('EVENT_RECEIVED');
  } else {
    // Returns a '404 Not Found' if event is not from a page subscription
    res.sendStatus(404);
  }

});

// Adds support for GET requests to our webhook
app.get('/webhook', (req, res) => {

  // Your verify token. Should be a random string.
  let VERIFY_TOKEN = "[PAGE_TOKEN]"
    
  // Parse the query params
  let mode = req.query['hub.mode'];
  let token = req.query['hub.verify_token'];
  let challenge = req.query['hub.challenge'];
    
  // Checks if a token and mode is in the query string of the request
  if (mode && token) {
  
    // Checks the mode and token sent is correct
    if (mode === 'subscribe' && token === VERIFY_TOKEN) {
      
      // Responds with the challenge token from the request
      console.log('WEBHOOK_VERIFIED');
      res.status(200).send(challenge);
    
    } else {
      // Responds with '403 Forbidden' if verify tokens do not match
      res.sendStatus(403);      
    }
  }
});

// Handles messages events
function handleMessage(sender_psid, received_message) {
  let response;

  // Check if the message contains text
  if (received_message.text) {    
    // Create the payload for a basic text message
    response = {
      "text": `You sent the message: "${received_message.text}". Now send me an image!`
    }
  }  
  
  // Sends the response message
  callSendAPI(sender_psid, response);    
}

// Handles messaging_postbacks events
function handlePostback(sender_psid, received_postback) {

}

// Sends response messages via the Send API
function callSendAPI(sender_psid, response) {
   // Construct the message body
    let request_body = {
      "recipient": {
        "id": sender_psid
      },
      "message": response
    }
    
    // Send the HTTP request to the Messenger Platform
    request({
    "uri": "https://graph.facebook.com/v2.6/me/messages",
    "qs": { "access_token": PAGE_ACCESS_TOKEN },
    "method": "POST",
    "json": request_body
  }, (err, res, body) => {
    if (!err) {
      console.log('message sent!')
    } else {
      console.error("Unable to send message:" + err);
    }
  }); 
}

    • Sample code in package.json
    {
      "name": "messenger-quick-start",
      "version": "1.0.0",
      "description": "An example webhook for Facebook Messenger quick start tutorial.",
      "main": "app.js",
      "scripts": {
        "start": "node app.js"
      },
      "repository": {
        "type": "git",
        "url": "https://github.com/fbsamples/messenger-platform-samples.git"
      },
      "author": "Facebook",
      "license": "ISC",
      "dependencies": {
        "body-parser": "^1.15.0",
        "express": "^4.13.4",
        "request": "^2.72.0"
      },
      "engines": {
        "node": "~4.1.2"
      }
    }


    Facebook webhook configuration

    • Launch the Facebook dashboard to "My Apps" section, select "Uncle Lubang" app.
    • Scroll to "Token Generation" section, select "Uncle Lubang" page.
    • Follow the steps from wizard to generate the token.
    • Scroll to "Webhooks" section, click on the "Setup Webhooks" button to launch. Fill in the Callback URL, Verify Token and check "messages", "messaging_postbacks" and "messaging_optins" checkbox. 
    Test the ChatBot


    Wednesday, September 12, 2018

    How to resolve "Cannot resolved symbol 'android'" error when apply GoogleMaps library?

    Prerequisite

    - Android Studio 3.1.4
    • Import GoogleMaps library to Android project, encounter error message "Cannot resolved symbol 'android'"

    Steps to resolve
    • Click on "Tools" → "SDK Manager" to launch "Default Settings" window
    • Click on "SDK Tools" tab and select "Google play services" checkbox. 

    • Click on "File" → "Project Structure" to launch "Project Structure" window
    • Click on "Dependencies" tab, add "com.google.android.gms:play-services-maps:15.0.1" library, rebuild the project and the issue will be resolved.

    Saturday, September 8, 2018

    How to resolve "jit-grunt: Plugin for the "karma" task not found." when execute grunt test?

    • Run the grunt command "grunt test", error message as shown below is displayed
    jit-grunt: Plugin for the "karma" task not found.
    If you have installed the plugin already, please setting the static mapping.
    See https://github.com/shootaroo/jit-grunt#static-mappings
    
    Warning: Task "karma" failed. Use --force to continue.
    
    Aborted due to warnings.
    
    • Execute the command below to install karma, the problem will be resolved.
    npm install grunt-karma karma karma-phantomjs-launcher 
    karma-jasmine jasmine-core phantomjs-prebuilt --save-dev
    

    Friday, September 7, 2018

    How to resolve "Path must be a string. Received null Use" error message when execute grunt script?

    • Run the grunt script, error message as shown below is displayed
    Running "jshint:all" (jshint) task
    Warning: Path must be a string. Received null Use --force to continue.
    Aborted due to warnings.
    
    • To resolve this, add the script as shown below to jshint section
    options:{
     reporterOutput:''
    },
    
    • Please refer to the sample source, it will work perfectly
    grunt.initConfig({
     jshint:{
      options:{
        reporterOutput:''
       },
       all:['script.js']
      }
     });
    

    Saturday, June 16, 2018

    How to upgrade PHP 7.2.6 on WAMP 3.0.6 server?

    Software Required
    - WAMP 3.0.6
    - PHP 7.2.6

    In the development stage, upgrading of PHP to support new library or functionality is unavoidable. WAMP has been used for my project development, however, PHP 7.2.6 doesn't exists in the WAMP 3.0.6. Below are the steps that I performed to import PHP interpreter into my WAMP container.

    PHP installation steps
    • Download PHP from https://windows.php.net/download#php-7.2
    • Unzip the PHP zip file into "php7.2.6" folder and copy into "D:\wamp64\bin\php" folder.
    • Copy wampserver.conf from "D:\wamp64\bin\php\php5.6.25" to "D:\wamp64\bin\php\php7.2.6"
    • Browse to "D:\wamp64\bin\php\php7.2.6" folder, rename "php.ini-development" to "php.ini.
    • Alter php.ini by changing the new configuration as shown below
    extension_dir = "d:/wamp64/bin/php/php7.2.6/ext"
    upload_tmp_dir ="d:/wamp64/tmp"
    error_log ="d:/wamp64/logs/php_error.log"
    
    • Alter the extension section at php.ini 
    extension=php_bz2.dll
    extension=php_curl.dll
    extension=php_fileinfo.dll
    extension=php_gd2.dll
    extension=php_gettext.dll
    extension=php_gmp.dll
    extension=php_intl.dll
    extension=php_imap.dll
    ;extension=php_interbase.dll
    extension=php_ldap.dll
    extension=php_mbstring.dll
    extension=php_exif.dll
    extension=php_mysqli.dll
    ;extension=php_oci8_12c.dll  ; Use with Oracle Database 12c Instant Client
    ;extension=php_odbc.dll
    extension=php_openssl.dll
    ;extension=php_pdo_firebird.dll
    extension=php_pdo_mysql.dll
    ;extension=php_pdo_oci.dll
    ;extension=php_pdo_odbc.dll
    ;extension=php_pdo_pgsql.dll
    extension=php_pdo_sqlite.dll
    ;extension=php_pgsql.dll
    ;extension=php_shmop.dll
    
    ; The MIBS data available in the PHP distribution must be installed.
    ; See http://www.php.net/manual/en/snmp.installation.php
    ;extension=php_snmp.dll
    
    extension=php_soap.dll
    extension=php_sockets.dll
    extension=php_sqlite3.dll
    ;extension=php_tidy.dll
    extension=php_xmlrpc.dll
    extension=php_xsl.dll
    ;extension=php_com_dotnet.dll
    ;extension=php_dba.dll
    ;extension=php_enchant.dll
    ;extension=php_ftp.dll
    ;extension=php_phpdbg_webhelper.dll
    ;extension=php_sodium.dll
    ;extension=php_sysvshm.dll
    ;extension=php_zend_test.dll
    
    • Duplicate php.ini file and save it as phpForApache.ini.
    • Alter wampserver.conf located at "D:\wamp64\bin\php\php7.2.6" folder
    $phpConf['apache']['2.4']['LoadModuleName'] = 'php7_module';
    $phpConf['apache']['2.4']['LoadModuleFile'] = 'php7apache2_4.dll';
    $phpConf['apache']['2.4']['AddModule'] =  '';
    
    • Launch wampserver manager, browse to "PHP" > "Version" menu, version 7.2.6 option is ready for selection. 
    • After select "7.2.6" menu and wamp manager has been restarted, browse to the site, PHP version 7.2.6 is displayed.